Do you know how to connect a porch roof to house? When I decided it was time to attach a porch roof to my house, I took the following steps.
It takes courage to take on a project like adding a roof to an existing porch. It requires skill and planning, and if done wrong, can lead to leaks and structural damage.
You can attach a porch roof to the main top successfully and without much difficulty if you have some fundamental woodworking or construction knowledge and skills.
Take a closer look at how you might approach it as we get right to it.
Table of Contents
What You Need to Know About Porch Roofs
While a porch is an addition to a building’s entrance and is intended to improve the building’s structural appearance, a porch is still a good place for the family to sit, unwind, and share memories of the day.
An attached porch with a roof, also known as a veranda, has a more sturdy and stable structural design than a porch that is freestanding. When a porch roof is attached to a house, some of the weight can be supported by the roof and structure of the house.
There are many different styles of porch roofs. Which one you ought to select is largely determined by your personal preferences and the design of the rest of your house. A pergola-style roof that is pitched similarly to the main house’s roof is common on attached porches.
When choosing, keep in mind the style of the existing roof on your home as well as the space available to support the porch roof. Make sure your porch roof blends in well with the rest of your house for the best resale value and appearance.
Read More: What Are Eaves on a House?
How Do You Connect a Porch Roof to a House?
Before attaching a porch roof to a house, just like when building anything else, you need a well-thought-out construction plan. Before deciding on a final design, make sure to thoroughly investigate all of your options. The final version of your plan ought to have a schedule for the project, a list of all the tools you’ll require, and detailed designs.
Your budget will stay in check, you’ll know what to do next, and you’ll have all the tools you need on building day thanks to all of this planning.
It’s crucial to keep patience in mind while both planning and construction are underway. Depending on your abilities, the tools you have, and the workforce you have available, the project may take two or three days to complete. Making designs and attaching a porch roof to a house is laborious work.
A porch roof typically has the following parts:
- Rafters
- A Purlin
- Wallplates
- Ceiling joist
Finding the proper canopy angle is one of the steps that many inexperienced builders struggle with. Take the porch’s depth and desired roof height into account as you search for the ideal roof angle for your porch.
You should be able to determine a suitable slope for the roof of your porch using these two measurements and the roof slope of the main house.
Step 1: Prepare the Tools
Here is a list of common tools and materials that you will need for building a porch and attaching the porch roof to the house:
- Nail gun
- Level
- Square
- Tape measure
- Electric drill (preferably cordless)
- Wooden beams
- Rafters
- Planks
- Ledger
- Utility knife
- Lag bolts
- Black roofing felt
- Oriented strand board
A run to the hardware or lumber store in the middle of the project won’t be necessary if all of your tools are in working order, your batteries are charged, and you have enough materials. Before beginning the project, make sure everything is in order once more to avoid mistakes and delays that could have been avoided.
Step 2: Check the Location, Elevation, and Electrical Equipment
There are a lot of things to take into account and think about before you start building anything. Below are a few of the things that you should check before getting started on building and attaching your porch:
- Determine the rise and run of the main house roof
- Consider the suitable roofing material to install the porch roof
- If we have an existing ground-level deck, connect the roof deck to it
- Check the electrical system and determine the requirements for electrical equipment like lights and fans
- Consider the location where we want to build the patio cover
Most of these things you’ll have already taken into account, but it’s always a good idea to review them just before getting started.
Step 3: Know Any and All Building Codes That Apply
Before beginning your construction project, confirm that it complies with all local, national, state, city, and county building codes and regulations. Prior to starting construction, secure all necessary building permits.
You may be required to submit the building plan for approval by your local building code office. In order to have your plan more easily approved, it is advisable to create it before you begin working on the project.
Your plan will be approved to move forward with construction if it complies with all local building regulations and codes. Otherwise, go back to the drawing board and create a porch design that complies with all specifications.
Step 4: Build Support Columns
Building a support column is the next step in order to give your porch roof the stability it needs.
For instance, you’ll need support columns at the two corners of a square porch that are furthest from the house. For the columns that extend from the porch floor to the soon-to-be-erected roof, construct a frame out of 2×4 studs. Brace the column in place with L-brackets and concrete screws.
Then, wrap the column frame in siding, brick, or any other outdoor material that complements the exterior of your house. Be aware that before installing them, you must choose the appropriate column design.
Step 5: Attach the Sill Plate to the House
The sill plate needs to be attached to the house between the porch’s two side supports as the next step. The top edges of the roof support columns should be flush with the sill plate.
Step 6: Position the Rafters on Top of the Sill Plate
Now is the time to place the rafters atop the sill plate. Mounting the rafters to the house will be simpler with joist hangers.
The rafters should be fastened to the sill plate with screws. The porch roof’s pitch will have a significant impact on where you should place your rafters.
You could choose to have a shallower roof pitch or match the pitch of your home. If you choose the latter, you might want to use 2×6 lumber for the rafters.
Step 7: Frame Your Porch Roof
Continue to add rafters to the frame until it extends one foot past the porch walls or support columns.
On the front and sides of your porch roof frame, attach the fascia board now. When there are inevitably irregularities in rafter length, a fascia is a roofing material that aids in balancing things out. Use galvanized finish nails to secure it while holding it up against rafters.
Step 8: Cover the Rafters
Now you can use thin plywood sheets to cover the rafters. As soon as the plywood is firmly in place, hammer it into the rafters.
Step 9: Pick Roofing Materials That Match Your Existing Roof
It’s a smart idea to use the same roofing material if you choose a roofing design that complements the roof of the main house to keep everything in line and make the space look cohesive.
The manufacturer should be consulted to ensure that the pitch of your roof complies with their recommendations because different roofing materials perform best when installed at different pitches.
Step 10: Install the Roofing Material
Now is the time to add your roofing materials to the porch roof, working your way out from the house to the edge of the porch. For the porch roof to have a seamless pattern, it might be necessary to remove some of the house’s shingles.
What is a Porch?
A porch is a covered area that usually connects to the front of the building. A visitor walks into our house and immediately notices it. You must maintain your home if you want to give it a modern and chic look. Depending on your preferences, there are various porch types available.
There are three typical porch roof designs, and each calls for a distinct method of fastening it to a building’s roof:
- For those who want to avoid having any leaks in their porch, a flat porch roof is a great option. You can have peace of mind knowing there won’t be any issues with the junction between these two surfaces because it uses rubber tiles, which must be covered by shingles from above to ensure it is leakproof.
- The top layer of underlayment on your main house must be covered with shingles in order to complete the installation of the shed roof. Additionally, you should install metal flashing along with it to prevent water from leaking into any exposed areas where rain could reach!
- Gable porch roofs are frequently built over the building’s preexisting shingles. In order to prevent water from entering your home’s foundation if it rains or snows a lot outside, they require more intricate construction and flashings along both valleys!
Common Porch Roof Designs
Even though there are nearly unlimited options for designing the roof of your porch, the vast majority feature at least one of these three basic structural designs:
- Flat Porch Roof
- Shed Porch Roof
- Gable Porch Roof
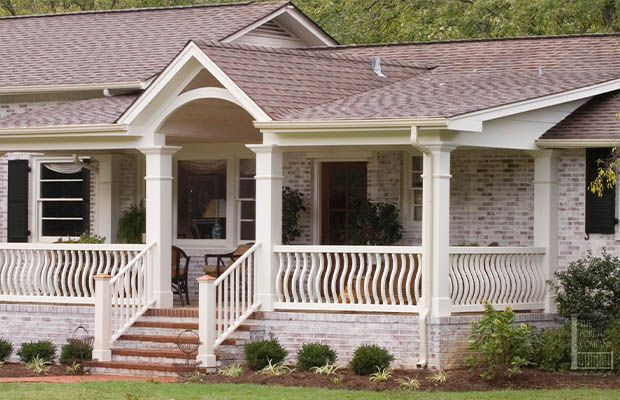
Flat Porch Roof
The flat porch roof, as its name suggests, spans the porch in a horizontal fashion. Each corner of the flat porch roof is supported by a post or pillar that serves as part of its structural integrity.
In order to allow water and snowmelt to drain off, flat porch roofs have a small slope (about 5 degrees) down and away from the house.
A simple and reasonably priced project is to add a flat porch roof to your home. Making sure the joint between the new porch roof and the house roof is waterproof is the most important consideration, though.
Even though a flat roof may be your top option, you should be aware that they are more prone to leaks than the other designs on this list.
Shed Porch Roof
The easiest porch roof to build is this one. It’s also the simplest to attach to an existing house roof. It’s a single, flat plane that attaches to the side or roof of your home before sloping down over the porch.
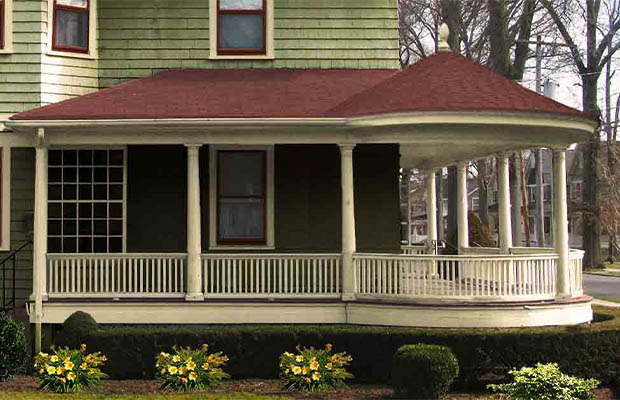
Gable Porch Roof
This style of porch roof has a triangle-shaped front view and sides that slope downward from a ridged peak. Compared to flat porches and shed porches, it’s one of the porch roofs that connects to the house the least easily.
It should be noted that compared to other types of porch roofs, it is also more intrusive to the existing house roof.
A gable porch roof has the advantage of requiring less upkeep than the other two types of porch roofs. Furthermore, it gives the porch a feeling of spaciousness that the other designs lack.
Read More: How to Insulate Garage Door?
FAQs
Can I Attach a Ledger Board to a Fascia?
The ledger can be connected to a band joist if your house has two stories. Measure the distance from the second-story window to the band joist. When you attach the ledger boards to the fascia, they should be held securely with bolts through the wall, or you can use lag screws.
How to Attach a Lean to Roof to An Existing Roof?
You’ll need to remove the existing shingles and cut back the existing eaves to make room for the shed roof, then nail a two-by-six ledger board on the existing roof; the ends of the shed rafters will rest on this ledger. A horizontal beam held up by posts will support the other end of the shed rafters.
What Holds a Porch Roof Up?
Posts and columns add to the beauty of your porch, but they are also the important vertical support that holds up your porch roof.
Final Thoughts
Being the part of a building that people first see and pay attention to, the roof of a house always serves as its front. The condition of the roof will determine how they perceive the entire structure.
Since the porch is situated right at the building’s entrance, its roof automatically becomes an extension of the main house’s roof. Before the rest of the roof and walls of the house are clearly visible from a distance, one of the first things you notice is the roof of the porch.
This article has discussed the process of attaching a porch roof to an existing house. We learned about the elements of a porch and roof, as well as how to construct a simple but reliable roofing square and choose an appropriate angle using the run and rise.
Read More: How To Turn Off Airplay?