Insulating the garage door will help keep your workshop warm this winter and all year long. As you begin this DIY project, here are some things to keep in mind.
We’ve put together all the knowledge you require to comprehend how to insulate garage door successfully, as well as advice on how to get the most out of the undertaking, keep reading!
Table of Contents
Types of Insulation to Buy
For a do-it-yourself garage insulation project, there are two different types of garage door insulation kits. A fiberglass batting kit with an R-8 vinyl face offers a comparatively high R-value. A typical 16-ft. needs two kits to be adequately insulated. wide garage door.
As an alternative, you can purchase precut R-4 expanded polystyrene (EPS) panel foam. Simply cut each panel to the appropriate length, bend it, and snap it into the door’s horizontal rails. EPS has the lowest R-value, though, at R-4 per inch. That may be sufficient and cost-effective insulation for a garage if you live somewhere with a moderate climate.
Higher R-values, up to R-9.8 with 1-1/2-in, can be obtained by cutting carefully and repeatedly.- thick foil-faced fire-rated extruded polystyrene (Insulated garage doors shouldn’t be made of unfaced, non-fire-rated XPS rigid foam (also known as XPS). Extremely flammable, it releases toxic fumes when set ablaze.
After that, purchase enough doorstop vinyl weather stripping to seal the top and sides of your garage door. If your current track is damaged, you’ll also need to buy a new vinyl bottom seal to fit it.
Project Step-by-step
Step 1. Measure, Mark, and Install the Retainer Pins
- Measure the area to find the 12-in. from each edge of the panel and midway between the horizontal rails.
- Mark the location, then remove the adhesive backing paper and press the retainer pin base onto the panel.
- Each panel should contain two retainer pins.
Step 2. Cut the Batting
- Mark the cutting lines on the batting before rolling it out with the vinyl side facing up.
- Put the batting on some leftover plywood. After that, use a straightedge to compress the insulated garage door and a utility knife to cut it.
Step 3. Lock the Batting in Place
- Push the insulation against the retaining pin until it tears the vinyl facing after aligning it so that it is in the center of the panel. Once it snaps into place, push the retaining cap over the pin.
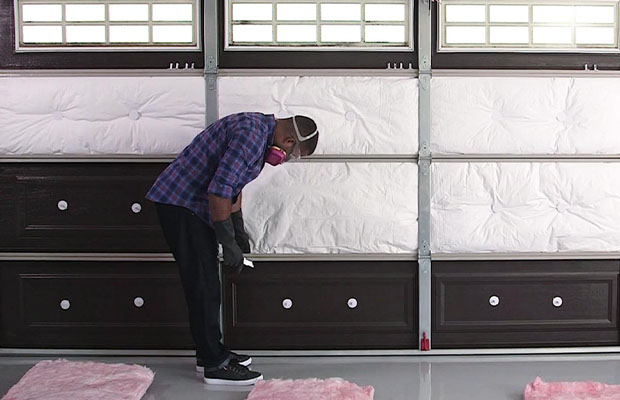
- We won’t be demonstrating how to cut and install XPS foam panels in this story because we decided to use the R-8 fiberglass insulation kit from ADO Products for our door.
- Start by using rags and household cleaning spray to clean each door panel. Following a clean water rinse, allow the areas to air dry.
- Add 1 inch to each panel’s measured height and width. to the length and width when you cut the batting to size for a snug fit. Instead of pre-cutting all the panels based on one measurement, measure each one as you go along the door as panel sizes may vary.
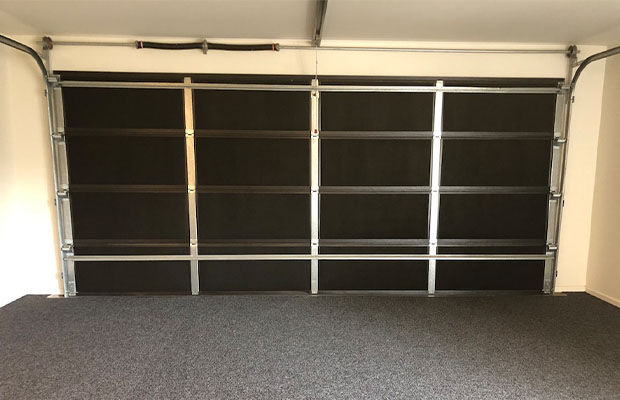
- With the vinyl side facing the garage, insert the cut insulation into the panel. Next, fasten it with the retaining pins. Continue doing this until all of the panels are insulated.
Step 4. Mount the Doorstop Weather Stripping
- Place the doorstop so the vinyl weather stripping is at a 45-degree angle against the top and side jambs of the door.
- Use nails that are partially driven in to hold it in place while you work on it.
Step 5. Readjust to Accommodate Door Movement
To mimic the effects of a strong wind, apply pressure to the door. The doorstop should then be turned inward to maintain a tight seal. Check the gap in several places along the sides because it might not be the same everywhere. Then, make any necessary adjustments.
Replace your current hinges with spring-loaded ones that press the door against the weather stripping at all times if the door has too much play for the doorstop to be adjusted properly or if you can see light through the doorstop weather stripping.
Step 6. Install a New Bottom Seal
Insert a fat-bladed screwdriver into the crimped area and twist to gently bend out the aluminum track. Repetition at both track ends
Step 7. Slide in the New Bottom Seal
Dishwashing detergent or silicone spray can be applied to the slots along the bottom track. After that, insert the vinyl seal and pull it into position. Utility knives can be used to trim off extra vinyl, and pliers are used to crimp the track’s ends.
In order to hold a vinyl seal, most steel doors have a track along the bottom. The vinyl may become more rigid from sun exposure and crack or separate in places, allowing cold air to enter. To keep the seal in place, installers typically crimp the slots at each end of the track. Slide out the old seal by releasing the crimps. Installing the new one next.
Step 8. Test the Door
If you lift a garage door partially and then let go, it should remain in place if it is properly balanced. However, insulation makes the door heavier, which could tip the balance. Work with a garage door service company to re-adjust the spring tension if your door drops after you let go of it. Your garage door opener may become damaged if the door is left unbalanced.
The Benefits of Insulating a Garage Door
The five main advantages of insulating a garage door are listed below.
Reduce Energy Bills
You might be surprised to learn that a poorly-fitting or uninsulated garage door can have an indirect impact on your utility costs. As a rule, garages are not considered “living spaces” because they are not heated, nor cooled. However, winds from outside will create a vacuum when they pass by your garage door, and if your garage door requires repair, air will be drawn from inside the garage.
Protect Items and Tools from Harsh Temperatures
Our garage is typically where we keep our tools and household items. We keep everything in storage, including ornaments (which frequently melt), paint (which occasionally freezes), and everything in between. The majority of the damage can be stopped even just by keeping the ambient temperature between 40 and 80 degrees fahrenheit.
Reduce Street Noise Entering the House
The additional sound-absorbing components found in insulation will be useful if you live close to a busy street or near other loud traffic. You might hear a 50% reduction in noise entering your home through your garage door, whether you use foam or fiberglass-faced batting.
A Sound Investment
Excuse the pun, but insulation almost always pays for itself after installation, wherever it is placed. In general, insulation doesn’t degrade and will last as long as the house.
Add Value
It may surprise you, but adding garage door insulation to your home can increase its value. Buyers frequently assume that because of the extra care and detail, the rest of the house must also be of high caliber.
Read More:
FAQs
What is the Easiest Way to Insulate a Garage?
The least expensive and most straightforward to install type of insulation is fiberglass, which is a great choice for a DIY project. To fit the wall studs, joists, and ceiling in your garage’s ceiling and floor, you can purchase fiber insulation in the form of bats and blankets.
How Can I Insulate My Garage Door Cheaply?
Insulating the door with fiberglass batts that are 1.5 inches thick is the least expensive method.
Does Insulating a Garage Door Make It Too Heavy?
The majority of insulation materials are lightweight, so an insulated garage door shouldn’t be noticeably heavier than one that isn’t. Additionally, insulation shouldn’t interfere with a garage door opener’s ability to open and close the door.
What is the R-value of An Insulated Garage Door?
That will depend on the insulation’s thickness. A 1.5-inch-thick rockwool batt can provide up to R-5.16, compared to a 1-inch-thick foam EPS foam board’s R-4.5 thermal resistance value.
Is An Insulated Garage Door Worth It?
In general, if you can afford it, an insulated garage door is the best long-term investment. The energy savings and year-round usability of the garage make insulated garage doors more expensive than non-insulated ones, but they pay for themselves over time.
Final Thoughts
Congratulations on successfully completing a worthwhile, significant home improvement project. Now, the first thing you’ll notice in your mirror when you pull out of your garage is the fantastic job you did.
Insulating a garage door should be done in conjunction with installing threshold seals at the bottom of doors, weatherstripping around walk-through doors, and (ideally) batt insulation in open stud walls. Sealing these gaps is a crucial part of preparing the garage for winter because some garage doors have gaps all the way around them.
Take advantage of your newly gained confidence and take on another project after insulating your garage door.
Read Next: Can A Surge Protector Go Bad?